Quick answer
To adjust image brightness, open the photo in an adjust tool, move Brightness until the subject reads clearly, then add a little Contrast and check the histogram so neither end piles up against the edge. Small moves are safer than large ones, because pixels pushed past pure black or white lose detail for good.
Most photos don’t need heavy editing. They need a nudge: a dim room made legible, a flat sky given some depth, a busy background softened. This guide explains what each slider actually does to the numbers inside your image, so you can make that nudge on purpose instead of by trial and error.
Everything here uses the Adjust colors and filters tool, which runs in your browser. Your photo is processed on your device and never uploaded.
What do brightness, contrast, and saturation actually change?
A typical photo stores each pixel as three numbers, one each for red, green, and blue, from 0 (none) to 255 (full). Every tone slider is a small formula applied to those three numbers, pixel by pixel. Knowing the formula tells you what the slider can and cannot fix.
| Slider | Range | What happens to each pixel | Typical use |
|---|---|---|---|
| Brightness | −100 to 100 | Adds the same offset to red, green, and blue. At 100 the offset is a full 255. | Lift a dark photo or tame a bright one |
| Contrast | −100 to 100 | Stretches or squeezes values around mid-gray (128). Positive values scale up to 3×; −100 flattens everything to gray. | Add punch to a hazy or flat image |
| Saturation | −100 to 100 | Pushes each color away from, or toward, its own gray value. −100 removes color entirely. | Richer color, or a muted look |
| Grayscale | On / off | Replaces color with luminance, weighted 0.2126 red, 0.7152 green, 0.0722 blue. | Make a photo black and white |
| Blur | 0 to 20 px | Averages each pixel with its neighbors within the radius, three times over. | Soften a background or hide detail |
| Sharpen | 0 to 100 | Exaggerates the difference between a pixel and its four neighbors. | Crisper edges after resizing |
The tone adjustments run in a fixed order: brightness first, then contrast, then saturation. That order matters. If you raise brightness by a lot, contrast then stretches values that are already near the top, which makes highlights clip sooner than you might expect.
How to adjust image brightness without losing detail
Brightness in Image Edtr is an offset. A setting of 20 adds 20% of 255, about 51, to every channel of every pixel. A shadow at 40 becomes 91, a midtone at 128 becomes 179, and a highlight at 230 would become 281. There is no 281, so it is stored as 255.
That last step is clipping. Once several neighboring pixels all land on 255, the subtle differences between them are gone. A cloud that had texture becomes a flat white patch, and no later slider can bring the texture back, because the information isn’t in the file anymore. The same thing happens at the bottom end when you lower brightness: everything below the offset collapses to 0, pure black.
- Start small. Try 10 to 20 first. Most underexposed phone photos only need that much.
- Watch the brightest area, not the subject. Skin, sky, and white shirts are where clipping shows first.
- Pair a brightness lift with a little contrast. An offset raises the dark end too, so shadows can look gray and washed out. A touch of contrast pulls them back down.
- Keep the original. Adjustments are applied to a copy. Download the result under a new name so you can always start over.
How to read a histogram
A luminance histogram is a bar chart of brightness. The horizontal axis runs from black on the left to white on the right. Each bar’s height shows how many pixels in the image have that brightness. It doesn’t show where those pixels are, only how many there are at each level.
- A tall wall at the left edge means many pixels are pure black. Shadow detail has been clipped.
- A tall wall at the right edge means many pixels are pure white. Highlights have been clipped.
- Everything bunched on the left is a dark, underexposed image. Everything bunched on the right is bright or overexposed.
- A narrow hump in the middle with empty space on both sides is a low-contrast, hazy image. Contrast spreads that hump out.
- Gaps and spikes (a comb-like shape) appear after strong edits. They mean nearby tones have merged, which can show up as banding in smooth gradients like skies.
There is no correct histogram shape. A night scene should lean left and a snowy field should lean right. What you’re checking is whether a change you made pushed a lot of pixels into either wall. If it did, back the slider off until the wall shrinks.
How do I increase contrast of a photo?
Contrast in Image Edtr scales each channel around mid-gray. Positive values multiply the distance from 128 by up to 3×; negative values shrink it, and −100 reduces every pixel to flat gray. Values that start at 128 don’t move, which is why contrast changes feel anchored in the midtones.
A worked example makes the limit clear. At contrast 50 the multiplier is 2×. A pixel at 64 becomes (64 − 128) × 2 + 128 = 0, and a pixel at 192 becomes 256, stored as 255. So at contrast 50, anything darker than 64 or brighter than 192 clips. On a hazy landscape whose values sit between 70 and 180, that is fine. On a photo that already uses the full range, it throws away a lot of shadow and highlight detail.
How to change saturation, or make a photo black and white
Saturation works on each pixel’s distance from its own gray. For every pixel, Image Edtr computes a luminance value, then moves the red, green, and blue channels toward that gray (negative saturation) or away from it (positive saturation). At 100, colors sit twice as far from gray as they did. At −100, they land exactly on it.
Strong positive saturation clips in its own way. A bright red flower already near 255 in the red channel has nowhere to go, so neighboring reds merge into a single flat shade. If petals lose their texture, reduce saturation until you can see the folds again. Skin tones are also sensitive; anything past about 30 tends to look sunburned.
To make a photo black and white, tick Grayscale. It doesn’t simply average the three channels. It uses the Rec. 709 luminance weights: 0.2126 × red + 0.7152 × green + 0.0722 × blue. Those weights follow how bright each color looks to the human eye, which is why a green field turns light gray and a deep blue sky turns fairly dark. A straight average would make blue look much lighter than it feels.
Black-and-white photos usually benefit from extra contrast, because color is no longer separating objects. In the photo editor, the Mono preset combines grayscale with a small contrast boost, and Noir uses much stronger contrast with a slight darkening.
How to fix a dark photo
A dark photo is the most common reason people reach for these sliders. The fix depends on whether the image is dark everywhere or only in the shadows, and the histogram tells you which.
- Check the histogram. If it’s bunched on the left but doesn’t touch the right edge, there’s room to brighten.
- Raise brightness gradually until the main subject is easy to read. Stop if a bright area such as a window starts to blow out.
- Add a little contrast, around 10 to 20, to restore depth to shadows that the offset lifted toward gray.
- Nudge saturation up slightly if colors look dull. Brightening often makes color feel weaker.
- Apply and compare with the original before downloading.
When should you sharpen or blur an image online?
Sharpen in Image Edtr is a 3×3 Laplacian. For each pixel it takes four times its own value, subtracts its four direct neighbors, and adds that difference back, scaled by the amount (0 to 100). On flat areas the difference is close to zero, so nothing changes. At edges the difference is large, so light sides get lighter and dark sides get darker. That is what reads as crispness.
Sharpening can’t recover focus that was never captured. It increases edge contrast, so a soft photo looks crisper, but a badly blurred one just gets halos: bright outlines along dark edges. The best time to sharpen is after shrinking an image, since downscaling softens edges slightly. See how to resize images for that step. Start around 20 to 40 and zoom to 100% to check for halos.
Blur goes the other way. Image Edtr runs a box blur, averaging each pixel with its neighbors within the chosen radius, three passes in a row. Three passes of a box blur closely approximate a Gaussian blur, and the cost stays the same however large the radius is. The radius goes from 0 to 20 px, so the same setting looks stronger on a small image than on a large one.
- Blur 1–2 px: softens noise or harsh texture without an obvious effect.
- Blur 5–10 px: turns a photo into a soft background for text or a slide.
- Blur 15–20 px: hides detail almost completely. Note that for genuinely sensitive information, such as a document number or a face, covering it with a solid shape is more reliable than blur.
When both are set, blur is applied before sharpen. In practice you’ll rarely want both on the same image.
How to adjust a photo in Image Edtr
Choose an image
Open Adjust colors and filters and drop in a JPEG, PNG, WebP, GIF (first frame), BMP, or AVIF if your browser can decode it.
Move the sliders
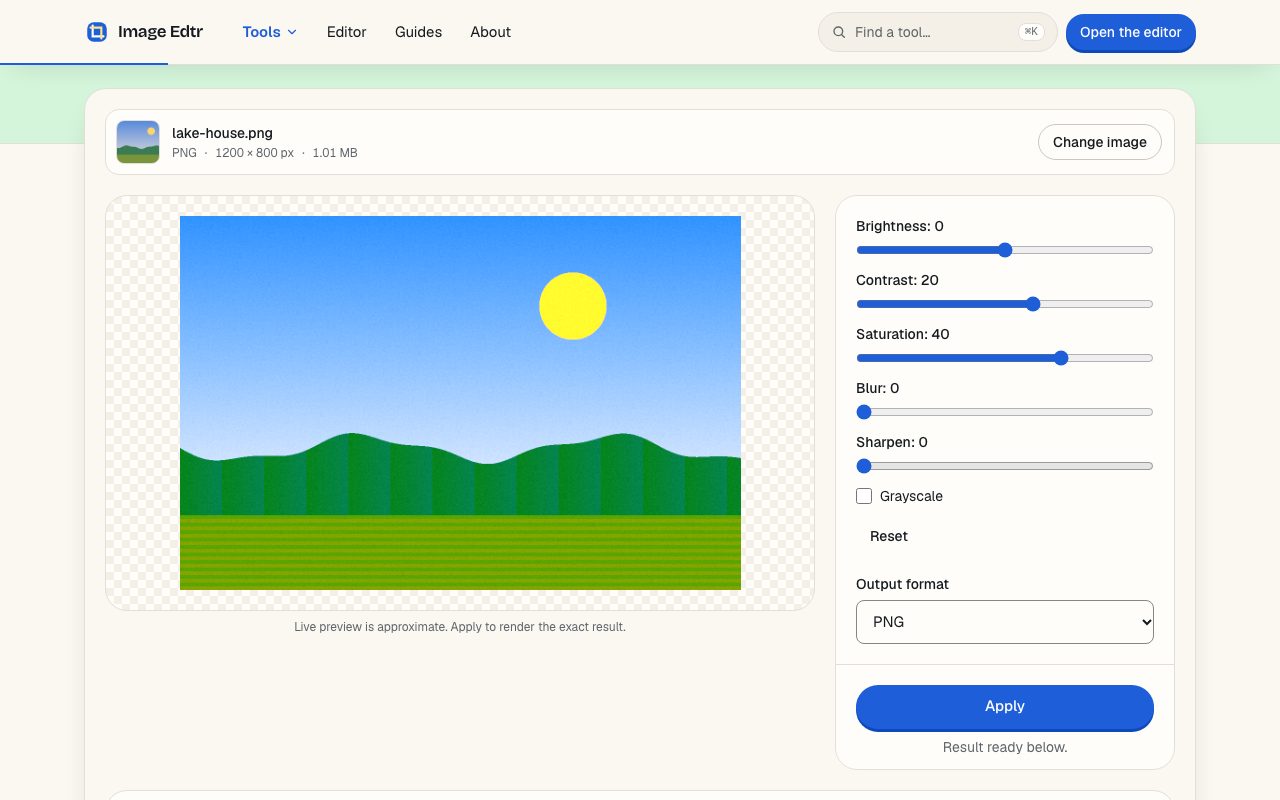
Set Brightness, Contrast, Saturation, Blur, and Sharpen, or tick Grayscale. The preview updates as you drag. Use Reset to return to neutral.
Select Apply
Apply renders the exact pixels. The live preview uses browser CSS filters, so it is a close approximation rather than the final result.
Compare and download
Check the result against the original, choose JPEG, PNG, or WebP, and download.
Filters run in a background worker where the browser supports it, so the page stays responsive. Blur and sharpen on very large photos can still take a few seconds.
Choosing an output format after adjusting
Saving an adjusted image re-encodes it. That has two consequences worth knowing. First, the new file doesn’t carry over the original’s metadata, such as camera settings or location. Second, the format you pick affects quality and size.
| Format | Choose it when | Watch out for |
|---|---|---|
| JPEG | It’s a photo for the web, email, or social media | Strong blur or smooth gradients can show blocky artifacts at low quality |
| PNG | You need exact, lossless pixels or transparency | Photos become much larger files |
| WebP | You want smaller web files at similar quality | Some older apps can’t open it |
For more on the trade-offs, read the image formats guide. If the file is still too large after editing, run it through compression as a final step.
Frequently asked questions
Why does my photo look washed out after brightening?
Brightness adds the same amount to every pixel, including the shadows, so dark areas turn gray instead of staying deep. Add 10 to 20 contrast after brightening to pull the shadows back down while keeping the midtones lifted. Check the histogram afterward so the right side doesn’t pile up against the edge.
Can I recover highlights that are already blown out?
Not from a JPEG, PNG, or WebP. Once pixels are stored as pure white, the detail that separated them is gone, and lowering brightness only turns them into flat light gray. If the photo came from a camera that saves RAW files, the RAW version may hold more highlight detail.
Is grayscale the same as setting saturation to −100?
They produce the same kind of result: color removed, with luminance kept using Rec. 709 weights. Grayscale is a single checkbox, so it’s quicker and leaves the saturation slider free. Either way, consider adding contrast, since black-and-white images often look flat without color to separate objects.
Why is the live preview slightly different from the final image?
The preview uses the browser’s CSS filters so it can update instantly as you drag. When you select Apply, the tool computes the exact pixels with its own formulas. The two are close, but blur and sharpen in particular can differ a little, so always judge the applied result.
How much should I sharpen an image?
Less than you think. Start between 20 and 40, then view the result at full size. If you see bright outlines along dark edges, or noise turning grainy, lower the amount. Sharpening works best after downscaling and cannot fix a photo that is genuinely out of focus.
Does blur hide sensitive information safely?
Not reliably. Blur averages pixels but keeps some of the underlying pattern, and short text or numbers can sometimes be guessed from it. For anything sensitive, crop it out or cover it completely. Use blur for soft backgrounds and mood, not for redaction.
Will adjusting an image remove its EXIF data?
Yes. The adjusted image is re-encoded as a new file, and the original metadata, such as camera model, date, and GPS location, is not copied over. That can be useful for privacy. Keep your original file if you need that information later.