Quick answer
To edit a photo online without uploading it, open it in Image Edtr’s photo editor. Rotate or flip it first, then crop, set brightness and contrast, adjust color or pick a filter, and export to PNG, JPEG, or WebP. Every edit can be undone, and the photo never leaves your device.
Most photos need only a few small fixes: a better crop, a level horizon, a little more light, colors that look like you remember. You don’t need a heavyweight app for that, and you don’t need to send personal photos to someone else’s server. This guide walks through what each edit does, the order that keeps quality high, and how to do it all in your browser.
What you can do in Image Edtr’s photo editor
The photo editor works on one photo at a time and has five tools, each in its own panel:
| Tool | Controls | Use it to |
|---|---|---|
| Crop | Free, 1:1, 4:3, 3:2, 16:9, 9:16 | Reframe the shot and fit a required shape |
| Rotate | 90° left, 90° right, Mirror, Flip | Fix sideways photos and mirrored selfies |
| Adjust | Brightness, Contrast, Saturation, Blur, Sharpen, Grayscale | Correct light and color, soften or sharpen |
| Filters | Original, Vivid, Crisp, Soft, Fade, Mono, Noir, Dream | Apply a ready-made look, then fine-tune it |
| Export | PNG, JPEG, or WebP; optional width | Save a full-resolution copy, resized if you like |
Around those tools you get undo and redo (Ctrl+Z and Ctrl+Shift+Z, or ⌘+Z and ⌘+Shift+Z on a Mac), a Compare with original button, Reset all, and a warning if you try to leave the page or open another photo with unsaved changes. It’s deliberately focused: there are no layers, text, shapes, AI tools, or free-angle straightening, and you can’t save an editable project. You export the finished photo instead.
Why the order of photo edits matters
Edits build on each other. Brighten a photo and then crop it, and you judged the exposure with distracting areas in view that are no longer there. Sharpen before you resize, and the sharpening is scaled along with everything else. Working in a consistent order means each decision is made on the version of the photo you’ll actually keep.
A dependable photo editing workflow goes from big, structural changes to small, finishing ones:
- Orientation. Rotate and flip so the photo is the right way up.
- Crop. Decide what’s in the frame and set the aspect ratio.
- Straighten. Level a tilted horizon (Image Edtr doesn’t have free-angle straightening; cropping slightly tighter can hide a small tilt).
- Exposure. Set brightness and contrast, the overall light and depth.
- Color. Adjust saturation, switch to grayscale, or apply a filter.
- Detail. Add sharpening last, or blur for a soft effect.
- Export. Choose a format, quality, and final size.
How to edit a photo online with Image Edtr
Open a photo
Go to the editor and choose Open a photo, or drop a JPEG, PNG, WebP, or other common image onto the page.
Rotate and crop
In Rotate, turn or mirror the photo if needed. Then in Crop, pick a ratio and drag the box or its corners on the photo.
Adjust light and color
In Adjust, move Brightness and Contrast first, then Saturation. Or try a look in Filters and fine-tune it in Adjust.
Compare and undo
Use Compare with original to check your progress, and undo any step you don’t like.
Export
In Export, choose PNG, JPEG, or WebP, set a width if you want a smaller copy, and select Export photo.
How to crop and rotate a photo
Phones and cameras record which way they were held, and most apps rotate the photo for you. When that goes wrong, or when you shot a document from above, use Left or Right in the Rotate panel to turn it in 90° steps. Mirror flips left to right, which fixes the reversed text you sometimes get in front-camera selfies. Flip turns it upside down.
Then crop. Choose Free to drag any shape, or a fixed ratio when the destination needs one: 1:1 for profile pictures and many social posts, 4:3 or 3:2 to keep a camera’s native shape, 16:9 for video thumbnails and slides, 9:16 for stories and vertical video. The panel shows the selection size in pixels, so you can see how much resolution you’re keeping.
A few composition habits make crops look intentional. Place the main subject on a rule-of-thirds line rather than always in the center. Leave a little space in the direction a person is looking or moving. Cut through limbs between joints, not at the wrist or knee. And crop out bright distractions near the edges, since the eye goes to the brightest area first. The cropping guide goes deeper on ratios and composition.
Brightness, contrast, saturation: what each slider does
Each slider in Adjust is a simple, predictable change to every pixel. Knowing what each one does helps you reach for the right one first.
- Brightness (−100 to 100) lifts or lowers every tone. Use it when the whole photo is too dark or too light. Pushed far, it washes out highlights or crushes shadows to flat black.
- Contrast (−100 to 100) stretches tones away from the middle (positive) or pulls them toward it (negative). More contrast adds punch to flat, hazy photos; less gives a softer, matte look.
- Saturation (−100 to 100) controls color intensity. Small positive values revive dull colors; skin tones turn orange quickly if you go too far.
- Grayscale removes color entirely. Black-and-white photos usually need a little extra contrast to avoid looking flat.
- Sharpen (0 to 100) increases local contrast along edges, making detail look crisper. A little goes a long way; too much creates bright halos.
- Blur (0 to 20) softens the whole image. It’s useful for a dreamy look or for a background image that text will sit on.
The histogram in the demo above is the most useful way to judge exposure objectively. It shows how many pixels sit at each brightness level, dark on the left and light on the right. A healthy photo usually spreads across most of the range without a tall spike pressed against either edge. Our guide to adjusting brightness and contrast explains reading it in more detail.
Photo filters, and how to make them your own
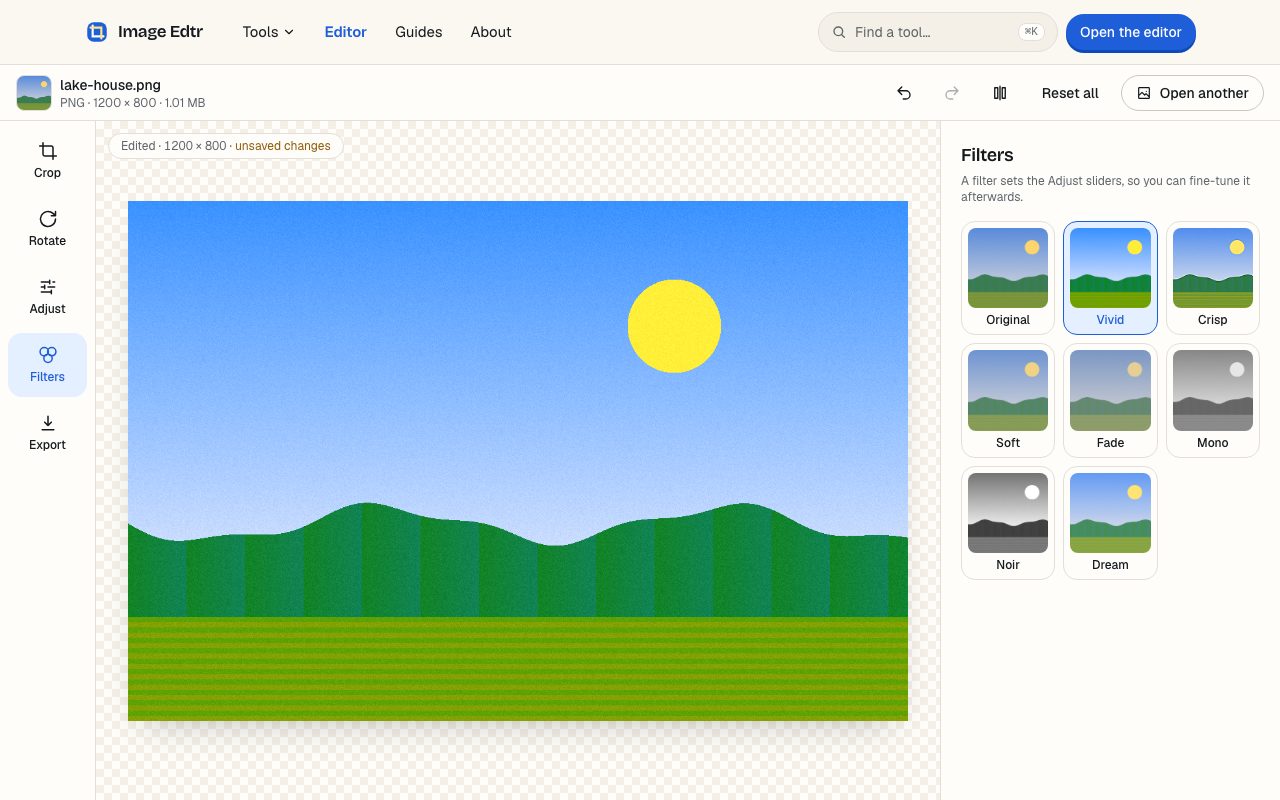
In Image Edtr, a filter is just a saved combination of the Adjust sliders. Selecting one sets the sliders for you, so after applying a filter you can open Adjust and see exactly what it did, then tune it. Here is what each filter sets:
| Filter | Settings | Good for |
|---|---|---|
| Original | All sliders at zero | Returning to the unedited look |
| Vivid | Contrast +15, Saturation +35 | Landscapes, food, flat cloudy-day photos |
| Crisp | Contrast +10, Sharpen 40 | Architecture, products, detailed textures |
| Soft | Brightness +5, Contrast −15, Saturation −10 | Portraits and gentle, low-key scenes |
| Fade | Brightness +8, Contrast −25, Saturation −25 | A muted, matte, vintage-style look |
| Mono | Grayscale, Contrast +10 | Clean black and white |
| Noir | Grayscale, Contrast +45, Brightness −5 | Dramatic, high-contrast black and white |
| Dream | Brightness +6, Saturation +10, Blur 1 | A soft, glowing look |
Because a filter replaces the Adjust settings, apply the filter first and make manual tweaks after. If you set sliders by hand and then pick a filter, your manual values are replaced; undo brings them back.
Filters work best as a starting point rather than a finish. A preset can’t know whether your photo is underexposed or already contrasty, so the same filter can look right on one image and heavy on the next. After applying one, open Adjust and pull back any slider that’s doing too much, usually saturation or contrast. If you edit a series of photos that should look consistent, such as a product set or a trip album, note the final slider values and enter the same ones on each photo.
Undo, compare, and reset
Every change is a step in a history you can move through. One continuous slider drag counts as a single step, so undo takes you back to where the drag started rather than one notch at a time. The history keeps up to 100 steps.
Compare with original shows the unedited photo while it’s on, which is the quickest way to notice when you’ve gone too far. Eyes adapt fast: after a few minutes of raising saturation, the edited version starts to look normal and the original looks dull. Comparing resets that. Reset all returns everything to the original in one step, and you can undo that too.
Is a photo editor without upload really private?
Yes. Image Edtr decodes, edits, and exports your photo in your browser, on your device. The file isn’t sent to a server, so it can’t be stored, scanned, or shared by one. That’s a meaningful difference for family photos, ID documents, or client work. The privacy page explains what the site does and doesn’t collect.
It also explains how the editor stays fast on a phone. While you edit, the preview is drawn from a copy of the photo up to 1,600 px on its longest side, using the same processing engine as the export. When you export, the same edits are applied to the full-resolution original, so what you see matches what you get, with more detail.
Exporting: format, quality, and size
The Export panel saves a new file with all your edits. Pick the format by where the photo is going:
- JPEG for sharing photos almost anywhere. Lower quality makes smaller files; transparent areas, if any, get a background color.
- WebP for websites. It’s usually smaller than JPEG at similar visual quality.
- PNG when you need lossless output or transparency. Photos saved as PNG are often much larger than JPEG.
Leave Width blank to keep the edited size, or enter a smaller width to make a lighter copy; the height follows the aspect ratio. Resizing happens after all other edits, at the very end. If the file is still too big for an email or upload form, the compress tool can shrink it further.
Frequently asked questions
Does the photo editor change my original file?
No. Your original stays exactly as it was. Every edit is stored as a list of settings and applied to a copy when you preview or export, and exporting saves a new file. That’s also why you can undo freely: nothing is baked into the source until you export.
Can I save my edits and continue later?
Not as an editable project. The editor works on one photo per session, and closing or reloading the page discards the edit history. Export the photo when you’re done; if you might want to change it later, keep the original file so you can start again from it.
How do I straighten a crooked horizon?
Image Edtr rotates in 90° steps only, so it can’t level a slightly tilted horizon. For a small tilt, a slightly tighter crop that keeps the horizon away from the frame edges makes the tilt less noticeable. For precise straightening, use an app with a free-angle rotate tool.
Why did my crop disappear when I rotated the photo?
Rotating by 90° swaps the photo’s width and height, so a crop drawn for the old orientation no longer fits. The editor clears it rather than guess. Rotate first, then crop. Mirroring and flipping don’t clear the crop; it moves with the image.
Can I add text, stickers, or remove objects?
No. The editor covers crop, rotate, light and color adjustments, filters, and export. It has no text, shapes, layers, or AI tools such as object removal. To add a text watermark, export your photo and use the watermark tool on the result.
Does the editor work on a phone?
Yes. On small screens the tools move to a row of tabs below the photo and their settings appear underneath. You can drag the crop box with your finger. Very large photos may hit memory limits on some phones; if an export fails, try a smaller export width.
Is the exported photo full resolution?
Yes, unless you ask for a smaller width. The preview uses a copy up to 1,600 px for speed, but export applies every edit to the full-resolution original. A crop reduces the pixel count to the area you kept, which the Crop panel shows as the selection size.