Quick answer
To batch resize images, add them all, set a maximum width and height so each one fits inside the same box, pick an output format and quality, and start the batch. Image Edtr processes up to 50 files in your browser, two at a time, and lets you download each result or a ZIP of completed files.
Preparing one image is a few clicks. Preparing forty for a product launch, a blog post, or a client handoff is where time disappears, and where small inconsistencies creep in: one photo a little larger, one saved at a different quality, one accidentally overwritten. Batch processing applies the same settings to every file, so the whole set comes out consistent. This guide explains how that works, what each setting does, and how to plan a batch that doesn’t fail halfway.
What batch image processing does (and doesn’t do)
The batch tool applies one operation with one set of settings to every file in the queue. You choose one of three operations:
- Compress: re-encode each image in the format and quality you choose, at its original pixel size.
- Resize (fit within): scale each image so it fits inside a maximum width and height, keeping its aspect ratio, then encode it.
- Convert format: write every file as JPEG, PNG, or WebP, whichever your browser can encode.
Every operation encodes with the output format and quality from the settings panel, so a resize run also compresses, and a compress run can also change the format. What the batch tool doesn’t do is apply edits that need a decision per photo. There’s no batch crop, rotate, watermark, or renaming pattern. Crop and rotate each photo individually first with the crop tool or the rotate and flip tool, then batch the rest.
How to batch resize images to fit within a size
Batch resizing uses a fit within rule. You set a maximum width and a maximum height, and each image is scaled down until both of its sides are inside that box. Its aspect ratio never changes, so nothing is stretched or cropped. That’s what makes it safe for a mixed set of landscape and portrait photos: each one gets as large as it can be without breaking the limit.
| Original | Shape | Result | What happened |
|---|---|---|---|
| 4000 × 3000 | Landscape 4:3 | 1600 × 1200 | Width hit the limit first |
| 3000 × 4000 | Portrait 3:4 | 1200 × 1600 | Height hit the limit first |
| 5000 × 5000 | Square | 1600 × 1600 | Both sides hit the limit |
| 1200 × 800 | Landscape 3:2 | 1200 × 800 | Already fits; not enlarged |
The last row depends on the Don’t enlarge smaller images option, which is on by default. With it on, images that already fit keep their size and are only re-encoded. With it off, they’re scaled up to touch the box. Upscaling can’t add detail that wasn’t captured, so leave the option on unless a system strictly requires exact dimensions.
To limit only one side, choose a large number for the other. For example, a maximum width of 1200 and a maximum height of 10000 makes every image 1200 pixels wide (or narrower, if it already was) regardless of height. The resize guide covers how to choose a target width for the layout where the images will appear.
Using the batch tool as a bulk image compressor
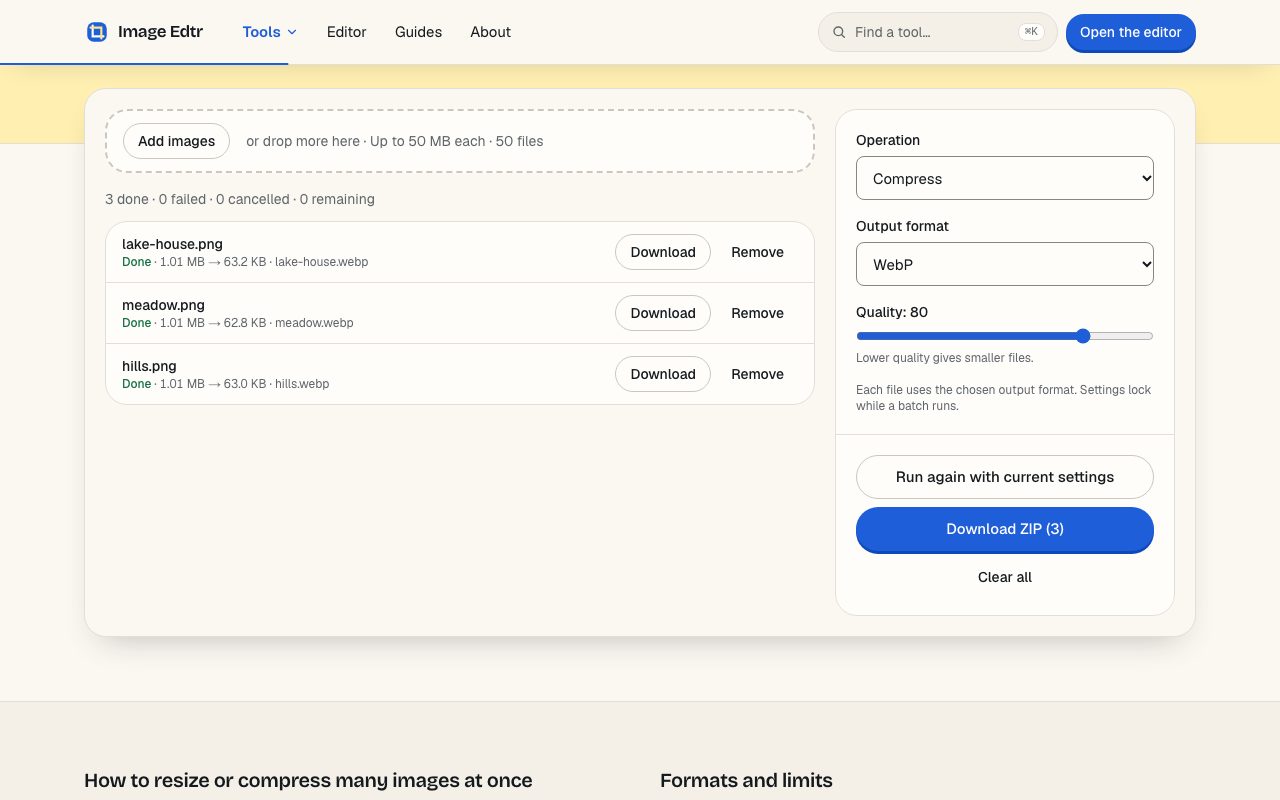
To compress multiple images, choose Compress, pick an output format, and set the quality. The defaults are WebP at quality 80, a common middle ground for photos on the web. Lower numbers give smaller files and more visible artifacts; higher numbers give larger, cleaner files.
Each finished file shows its size before and after, such as “3.2 MB → 410 KB”. Read those numbers rather than assuming. Compression can make some files larger, especially images that were already heavily compressed, or flat graphics converted from PNG to a photo format. If a file grows, keep the original or try another format. The compression guide explains how quality, format, and pixel size each affect file size, and Google’s WebP documentation describes the format’s lossy and lossless modes.
How to convert multiple images at once
Choose Convert format, then pick JPEG, PNG, or WebP. Only formats your browser can encode appear in the list. Every file is written in that format, whatever it started as, so a folder of PNG screenshots and JPEG photos can all become WebP in one pass.
- Converting to JPEG: JPEG can’t store transparency, so transparent areas are filled with the background color you choose (white by default).
- Converting to PNG: lossless and supports transparency, but photos usually get much larger. Good for graphics, logos, and screenshots.
- Converting to WebP: supports transparency and lossy compression, and current versions of major browsers display it. Some older apps and email clients don’t, so keep JPEG copies for those.
- Inputs you can add: JPEG, PNG, WebP, GIF (first frame only), BMP, and AVIF or HEIC only where your browser can decode them. AVIF and HEIC can be read but not written.
For help choosing a target format, the image formats guide compares them by use case, and MDN keeps a detailed image file type and format guide.
Resize multiple images at once with Image Edtr
Add images
Drop files onto the tool or select Add images. Up to 50 files fit in one batch; any beyond that aren’t added, and a notice tells you how many were left out.
Choose the operation
Pick Compress, Resize (fit within), or Convert format. For resize, set Max width (px) and Max height (px) and decide whether to keep Don’t enlarge smaller images checked.
Set the output
Choose the output format and, for JPEG and WebP, the quality. For JPEG, choose a background color for transparent areas.
Start the batch
Select Start. Files move from Waiting to Checking file, Processing, and Done, two at a time. Settings lock while the batch runs. Cancel any single file, or select Cancel remaining.
Download the results
Download any finished file on its own, or select Download ZIP to get every completed file in one archive. Retry failed or cancelled files from the list.
How the queue works: two at a time, one failure never stops the rest
The queue processes two files at a time. Each file is first checked (is it a real, supported image within the limits?), then decoded, transformed, and encoded. When one finishes, the next waiting file starts. Limiting the work to two keeps memory use predictable, which matters on phones and laptops with less RAM.
Each file succeeds or fails on its own. A corrupt file, an unsupported format, or an image that’s too large is marked Failed with a short reason, and the queue moves on. Cancelling a file stops only that file. Failed and cancelled files keep a Retry button, so you can fix the cause and run just those again instead of restarting the batch. If you change settings after a run, Run again with current settings reprocesses the whole list.
How long does a batch take?
It depends on your device, the number of pixels in each image, and the output format, since all of the work happens locally. Large photos take longer than small ones because every pixel is decoded and encoded. Each image is also decoded twice: once while it’s checked and once while it’s processed. Keep the tab open and in the foreground while a batch runs, because browsers may slow down work in background tabs.
| Limit | Value | Why it exists |
|---|---|---|
| File size | 50 MB per file | Very large files are slow to read and decode |
| Pixel count | 40 megapixels | A decoded image needs about 4 bytes per pixel, so 40 MP is roughly 160 MB of memory |
| Longest side | 16,384 px | Browsers cap canvas dimensions |
| Files per batch | 50 | Keeps the queue and the ZIP manageable in memory |
File names, duplicates, and downloading images as a ZIP
Each output keeps the original file’s name and gets the extension of its new format. beach.jpg converted to WebP becomes beach.webp. Characters that are unsafe in file names are removed.
Collisions happen more often than you’d expect in batches. Two files from different folders can both be called photo.jpg, and after conversion photo.jpg and photo.png would both become photo.webp. The batch tool makes every output name unique, comparing names without regard to letter case, so the second becomes photo (2).webp, the third photo (3).webp, and nothing is overwritten. If names matter for your site or store, rename the originals before adding them, since the tool has no renaming pattern.
When you download images as a ZIP, the archive is named image-edtr-batch.zip and contains only completed files. Failed, cancelled, and unfinished files are left out, and a summary lists them so you know what’s missing. The ZIP is assembled in your browser’s memory, so a very large batch can fail to zip. If that happens, download the files individually or split the work into smaller batches.
Batch workflows for websites, stores, and social media
A batch works best when everything that needs individual judgment is done first. Some practical patterns:
- Blog and website images: resize to fit within the widest size your layout displays (often a little over the content column width, to allow for high-density screens), output WebP at a moderate quality, and keep JPEG fallbacks if older clients matter. MDN’s guide to responsive images explains serving several sizes with
srcset; run one batch per size. - E-commerce product photos: crop each photo to the same aspect ratio first (square is common for catalog grids), then batch resize to one maximum size so the grid looks even. Check your store platform’s current image requirements.
- Social media sets: crop each image to the platform’s shape, then batch compress to JPEG so it opens everywhere. Platforms usually re-compress uploads, so very low quality settings buy little.
- Sending photos by email: resize to fit within something like 2000 × 2000 and compress to JPEG to keep attachments small. Source metadata, including GPS location, isn’t copied to the outputs.
Because outputs are re-encoded from the decoded image, they don’t carry the source metadata, and color profiles aren’t preserved; output is sRGB. Animated GIF and WebP files are read as their first frame only. If you need a file left untouched, keep the original.
Frequently asked questions
How many images can I process at once?
Up to 50 files per batch, with two processed at the same time. Each file can be up to 50 MB and 40 megapixels, with no side longer than 16,384 pixels. For larger sets, run several batches. Downloading each ZIP before clearing the list keeps your browser’s memory use comfortable.
Can I resize and compress in the same batch?
Yes. Choose Resize (fit within), set the maximum width and height, then pick the output format and quality. Every operation encodes with those output settings, so the resized files are also compressed. You only need a separate Compress run if you want to keep the original pixel dimensions.
Why are some files missing from my ZIP?
The ZIP includes only files that finished successfully. Files that failed, were cancelled, or hadn’t finished are left out, and the summary lists how many. Retry failed or cancelled files from the list; once they show Done, download the ZIP again to include them.
Will batch resizing stretch or crop my photos?
No. Fit within keeps each image’s aspect ratio and scales it until both sides are inside your maximum width and height. Landscape and portrait photos in the same batch end up different shapes, each as large as the limits allow. If you need identical shapes, crop each image first.
Why did one file get bigger after compressing?
Re-encoding doesn’t always shrink a file. An image that was already heavily compressed, a small graphic, or a flat-color PNG converted to a photo format can come out larger. The batch list shows each file’s size before and after, so you can spot it and keep the original or try a different format.
Can I batch crop or rotate images?
Not in the batch tool. It supports compress, resize, and convert, because cropping and rotating usually need a decision for each photo. Use the crop tool and the rotate and flip tool on individual images first, then add the results to a batch to resize, compress, or convert them together.
Does the batch tool upload my images?
No. Files are read, processed, and zipped by your browser on your device, and the site makes no network request containing your images. That also means speed depends on your device: a fast laptop finishes a batch sooner than an older phone. The privacy page has the details.