Quick answer
A photo collage maker combines several photos into one image by placing them in a grid. Choose the number of columns, a cell size that matches your photos’ shape, and an even spacing, then pick Fill to crop images edge to edge or Fit to show each one whole. The output size follows directly from those numbers.
A good collage looks effortless, but it rests on a few numbers: how many columns, how big each cell is, and how much space sits between them. Get those right and the photos line up cleanly. Get them wrong and you end up with awkward gaps, odd crops, or a file that’s the wrong size for where you’re posting it.
This guide explains the layout math and the choices behind it, using the Collage and grid maker. It runs in your browser, so you can make a collage online without uploading your photos anywhere.
How a photo collage maker builds a grid
Image Edtr’s collage maker uses a uniform grid. Every cell has the same width and height, every gap is the same size, and photos fill the grid left to right, top to bottom, in the order you add them. There are no templates or free-form layouts, which keeps the result tidy and predictable.
| Setting | Range | What it controls |
|---|---|---|
| Images | 2 to 12 | How many photos go into the grid, in the order listed |
| Columns | 1 to 6 | Photos per row. Rows are added automatically. |
| Cell width and height | 50 to 4,000 px each | The size of every cell, and so the shape of every photo slot |
| Spacing | 0 to 200 px | The gap between cells and around the outside edge |
| Image fit | Fill or Fit | Fill crops each photo to its cell; Fit shows the whole photo inside it |
| Background | Any color | The color of the gaps, the border, and any empty space |
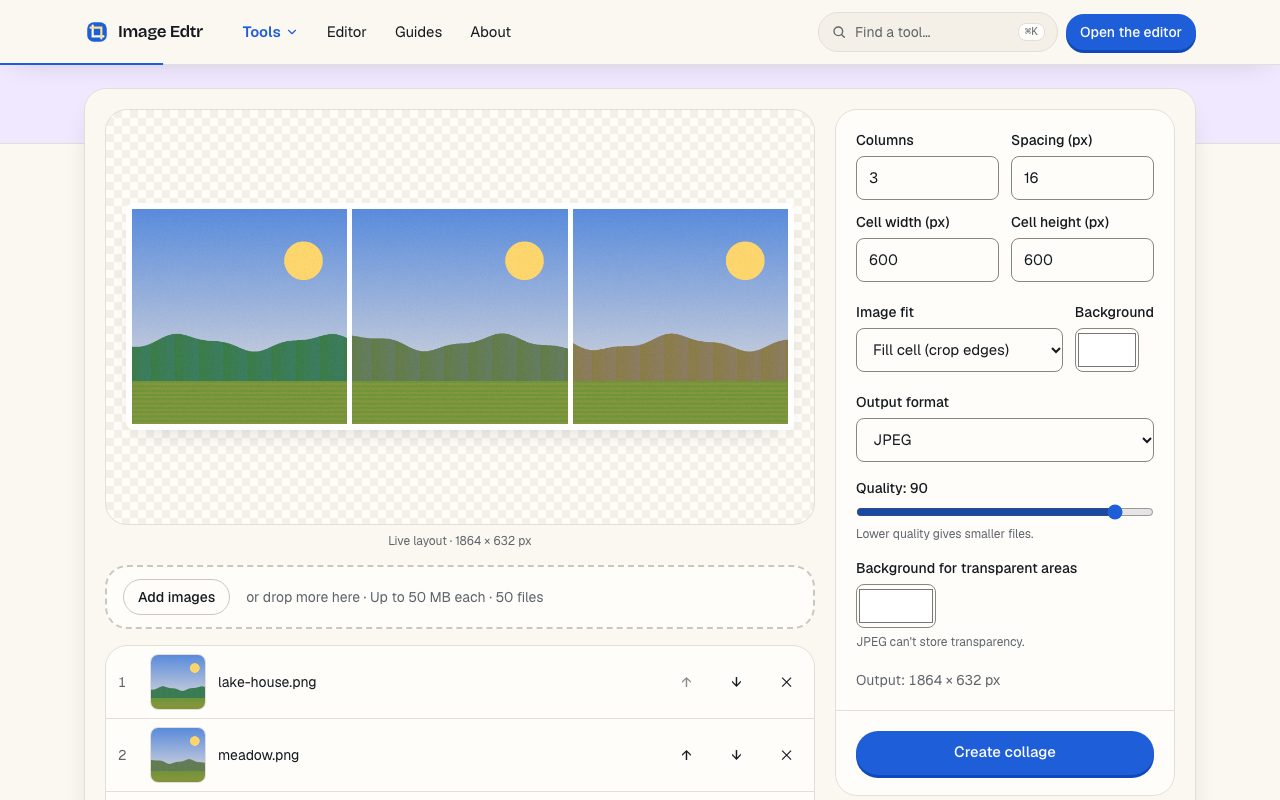
The defaults are 3 columns, 600 × 600 px cells, 16 px spacing, Fill, and a white background, exported as JPEG. That’s a sensible starting point for a square photo grid of 3, 6, or 9 images.
How big will my collage be? The layout math
The output size is fixed by your settings, not by the photos. Spacing appears between cells and also around the outer edge, so a grid with c columns has c + 1 gaps across it. The same goes for rows.
- Width = columns × cell width + (columns + 1) × spacing
- Height = rows × cell height + (rows + 1) × spacing
- Rows = the number of images divided by columns, rounded up
With the defaults and 9 photos, that’s 3 × 600 + 4 × 16 = 1,864 px wide and the same tall. With 6 photos in 3 columns, it’s 1,864 px wide and 2 × 600 + 3 × 16 = 1,248 px tall. The tool shows the output size under the settings as you change them.
If you ask for more columns than you have photos, the grid uses only as many columns as there are images. Four photos in a 6-column setting become a single row of 4.
Choosing a collage layout: columns and image count
The cleanest grids have no empty cells, which means the number of photos divides evenly by the number of columns. When it doesn’t, the last row is left partly empty and those cells show the background color.
| Images | Full-grid options (columns × rows) |
|---|---|
| 2 | 2 × 1, 1 × 2 |
| 3 | 3 × 1, 1 × 3 |
| 4 | 2 × 2, 4 × 1 |
| 6 | 3 × 2, 2 × 3, 6 × 1 |
| 8 | 4 × 2, 2 × 4 |
| 9 | 3 × 3 |
| 10 | 5 × 2, 2 × 5 |
| 12 | 6 × 2, 4 × 3, 3 × 4, 2 × 6 |
Counts like 5, 7, and 11 can’t make a full rectangle except as a single row or column. You have three options: add or remove a photo, accept an empty cell and make the background deliberate, or arrange them in one long strip.
Wider grids suit landscape viewing, such as a website header or a slide. Taller grids suit phones, where people scroll vertically. Two or three columns keep each photo large enough to read on a small screen; five or six columns turn photos into thumbnails.
Order is part of the layout too. In left-to-right languages the first cell is a natural starting point, so it’s a good spot for your strongest photo. Alternate close-ups with wide shots, and light images with dark ones, so no single area of the grid feels heavy. If two photos are nearly identical, separate them or drop one; repetition is more noticeable in a grid than in a slideshow. Because the tool fills cells strictly in list order, rearranging the list is how you rearrange the collage.
What cell size should I use?
Cell shape matters more than cell size. When the cell’s aspect ratio matches the photos, Fill crops very little and Fit leaves very little empty space. When it doesn’t, something has to give.
| Photos | Aspect ratio | Example cell size |
|---|---|---|
| Most phone photos, landscape | 4:3 | 800 × 600 |
| Most phone photos, portrait | 3:4 | 600 × 800 |
| Widescreen and video frames | 16:9 | 960 × 540 |
| Square crops or mixed orientations | 1:1 | 600 × 600 |
Mixed portrait and landscape photos are the hardest case. Square cells are the fairest compromise: every photo loses some edge in Fill, but none is drastically cropped. If you want precise control over what gets cut, crop the photos to the same ratio first and then add them. The aspect ratio of each cell is simply cell width divided by cell height.
For pixel size, think about where the collage will be seen. A collage for a phone screen rarely needs to be wider than about 1,080 to 2,000 px. Bigger cells mean a larger file without visible benefit there. For print, larger cells keep more detail from each photo, as long as the source photos are at least that big.
Fill or Fit: cropping versus letterboxing
Each photo is placed in its cell in one of two ways, both centered.
- Fill (crop edges) scales the photo until it covers the whole cell, then trims what spills over. Cells are completely filled, and the grid looks solid. The center of each photo is kept, so subjects near an edge can be cut off.
- Fit (whole image) scales the photo until it just fits inside the cell. Nothing is cropped, but if the shapes differ, the background color shows above and below, or on either side.
Fill is usually the right choice for a photo grid on social media, where a solid block reads best. Fit is better when every part of each image matters, such as screenshots, artwork, or product shots. With Fit, a background that matches the gap color makes the letterbox bars look like part of the frame instead of a mistake.
Spacing and background: making a grid look intentional
Spacing does the same job as margins on a page. It separates photos so each one reads on its own, and it frames the whole collage with an equal border, because the outer edge uses the same value as the gaps between cells.
- 0 px gives a seamless mosaic. Works when the photos share a color palette; can look busy when they don’t.
- 8–24 px is a thin, clean divider at typical social sizes.
- 40 px and up gives a gallery or print-mat feel, with the background acting as a frame.
Spacing is in pixels, so the same value looks thinner on a bigger collage. A 16 px gap is clear on a 1,080 px grid but looks like a hairline on a 4,000 px grid meant to be scaled down. Scale the gap with the cell size if you want the proportions to stay the same.
White and off-white backgrounds feel light and clean. Black or a deep neutral makes colors look richer and suits night or moody photos. A brand color can work well for marketing, especially with wider spacing. The color palette tool can pull a color from one of your photos so the background ties the set together.
How to make a picture collage for Instagram
To hit an exact size, work backward from the target. Subtract the total spacing, then divide what’s left by the number of columns or rows. Square posts at 1,080 × 1,080 px and portrait posts at 1,080 × 1,350 px (4:5) are common sizes for feeds.
| Target | Images and layout | Spacing | Cell size |
|---|---|---|---|
| 1,080 × 1,080 (square) | 4 photos, 2 columns | 20 px | 510 × 510 |
| 1,080 × 1,080 (square) | 9 photos, 3 columns | 12 px | 344 × 344 |
| 1,080 × 1,350 (4:5) | 6 photos, 2 columns | 12 px | 522 × 434 |
| 1,080 × 1,350 (4:5) | 4 photos, 2 columns | 0 px | 540 × 675 |
For example, a 3 × 3 square grid with 12 px spacing has four gaps across: 1,080 − 4 × 12 = 1,032, and 1,032 ÷ 3 = 344 px per cell. If the division doesn’t come out even, round the cell down and adjust the spacing by a pixel or two.
How to combine photos into one image with Image Edtr
Add 2–12 images
Open the Collage and grid maker and add JPEG, PNG, WebP, GIF (first frame), BMP, or AVIF files your browser can decode.
Set the order
Use the up and down arrows to reorder photos, or remove one with the ✕ button. Photos fill the grid left to right, top to bottom.
Choose the grid
Set Columns, Cell width, Cell height, Spacing, Image fit, and Background. The live layout and output size update as you go.
Create and download
Pick JPEG, PNG, or WebP, select Create collage, preview the result, and download.
Photos are decoded one at a time while the collage is drawn, which keeps memory use down on phones. The collage is a new file, so metadata from the source photos isn’t carried over. JPEG is a good default for photo collages; PNG is larger but keeps flat colors and thin gaps perfectly crisp. If you want to add a credit, run the finished collage through the watermark tool.
Frequently asked questions
Why is there an empty space in my collage?
The number of photos doesn’t divide evenly by the number of columns, so the last row isn’t full and the unused cells show the background color. Change the column count, add or remove a photo, or choose a background that makes the gap look intentional.
Can I make some photos bigger than others?
Not in this tool. Every cell in the grid is the same size, which keeps layouts even and predictable. For a featured photo, you could make a two-image collage of the hero shot and a grid you created first, since a finished collage can be added as an image.
Why are the edges of my photos cut off?
You’re using Fill, which scales each photo to cover its cell and crops whatever doesn’t fit, keeping the center. Switch to Fit to show each whole photo, change the cell’s width and height to match your photos’ shape, or crop the photos beforehand so the important part is centered.
Does spacing include a border around the edge?
Yes. The spacing value is applied between cells and around the outside of the grid, so the border is always the same width as the gaps. Set spacing to 0 for an edge-to-edge mosaic with no border at all, or raise it for a wider frame.
Can the collage background be transparent?
The background is a solid color you choose. If you need transparency, you would have to remove it in another editor afterward. For most uses, matching the background to the page or post where the collage will appear gives the same visual effect.
What file format should I export a collage in?
JPEG suits most photo collages and keeps the file small for sharing. WebP is often smaller at similar quality for websites. PNG is lossless and keeps thin gaps and flat backgrounds perfectly sharp, but photo collages saved as PNG are much larger files.
How do I change the order of photos?
Each photo in the list has up and down arrow buttons. Move photos until the order matches how you want the grid to read: the first photo goes in the top-left cell and the rest follow left to right, row by row.